
당분간 User 레이어를 구현할것입니다!!!
- UserEntity 를 구현한다.
- UserRepository 구현
- UserService 구현
- UserDTO/UserController 구현
사용자는 id, username, email, password로 로그인을하고 구성되어있습니다.!
그래서 해당 정보들이 들어가는 Entity를 구현해봅시다

package com.unoSpringBoot.study.model;

import javax.persistence.Column;
import javax.persistence.Entity;
import javax.persistence.GeneratedValue;
import javax.persistence.Id;

import org.hibernate.annotations.GenericGenerator;

import lombok.AllArgsConstructor;
import lombok.Builder;
import lombok.Data;
import lombok.NoArgsConstructor;

@Builder
@NoArgsConstructor
@AllArgsConstructor
@Data
@Entity
public class UserEntity {
	@Id
	@GeneratedValue(generator = "system-uuid")
	@GenericGenerator(name = "system-uuid", strategy = "uuid")
	private String id; // 사용자에게 고유하게 부여되는 id
	@Column(nullable = false)
	private String userName;// 사용자이름
	@Column(nullable = false)
	private String email;// 사용자의 이메일, 아이디와 같은 기능
	@Column(nullable = false)
	private String password;// 패스워드
}
이 유저 엔티티를 사용하려면 유저리파지토리를 작성해야합니다! 작성해봅시다!
package com.unoSpringBoot.study.persistence;

import java.util.List;

import org.springframework.data.jpa.repository.JpaRepository;
import org.springframework.stereotype.Repository;

import com.unoSpringBoot.study.model.UserEntity;

@Repository
public interface UserRepository extends JpaRepository<UserEntity, String> {
	List<UserEntity> findByUserId(String userId);

	UserEntity findByEmail(String email);

	Boolean exitsByEmail(String email);

	UserEntity findByEmailAndPassword(String email, String password);
}
이젠 유저 서비스를 만들어 데이터베이스에 저장된 사용자를 가져올때 사용할 클래스를 만들어줍시다!!
유저리파지토리를 이용해 사용자를 생성하고 로그인 시 인증에 사용할 메서드를 작성해줍시다!!
package com.unoSpringBoot.study.service;

import org.springframework.beans.factory.annotation.Autowired;
import org.springframework.stereotype.Service;

import com.unoSpringBoot.study.model.UserEntity;
import com.unoSpringBoot.study.persistence.UserRepository;

import lombok.extern.slf4j.Slf4j;

@Slf4j
@Service
public class UserService {

	@Autowired
	private UserRepository userRepository;

	public UserEntity createUser(final UserEntity userEntity) {
		if (userEntity == null || userEntity.getEmail() == null) {
			throw new RuntimeException("유효하지 않은 값이 들어왔습니다!");
		}
		final String email = userEntity.getEmail();
		if (userRepository.exitsByEmail(email)) {
			log.warn("이 이메일은 이미 있습니다. {}", email);
			throw new RuntimeException("이 이메일은 이미 있습니다.");
		}
		return userRepository.save(userEntity);
	}

	public UserEntity getByCredentials(final String email, final String password) {
		return userRepository.findByEmailAndPassword(email, password);
	}

}
이 메서들을 이용해 현 사용즈를 가져오는 기능과 레지스터 기능을 구현하는 UserController를 구현합니다!!
이를 위해 UserDTO를 구현해줍니다!
package com.unoSpringBoot.study.DTO;

import lombok.AllArgsConstructor;
import lombok.Data;
import lombok.NoArgsConstructor;

@NoArgsConstructor
@AllArgsConstructor
@Data
public class UserDTO {
	private String token;
	private String email;
	private String username;
	private String password;
	private String id;
}
package com.unoSpringBoot.study.Controller.User;
import org.springframework.beans.factory.annotation.Autowired;
import org.springframework.http.ResponseEntity;
import org.springframework.stereotype.Service;
import com.unoSpringBoot.study.DTO.ResponseDTO;
import com.unoSpringBoot.study.DTO.UserDTO;
import com.unoSpringBoot.study.model.UserEntity;
import com.unoSpringBoot.study.service.UserService;
@Service
public class RegistUserCO {
@Autowired
private UserService userService;
public ResponseEntity<?> registUser(UserDTO userDTO) {
try {
UserEntity userEntity = UserEntity.builder().email(userDTO.getEmail()).userName(userDTO.getUsername())
.password(userDTO.getPassword()).build();
// 서비스를 이용해 리포지터리에 사용자 저장
UserEntity registeredUser = userService.createUser(userEntity);
UserDTO responseUserDTO = UserDTO.builder().email(registeredUser.getEmail()).id(registeredUser.getId())
.username(registeredUser.getUserName()).build();
return ResponseEntity.ok().body(responseUserDTO);
} catch (Exception e) {
// 사용자 정보는 항상 하나이므로 리스트로 만들어야하는 ResponseDTO를 사용하지 않고 그냥 UserDTO리턴하도록 함
ResponseDTO<Object> responseDTO = ResponseDTO.builder().error(e.getMessage()).build();
return ResponseEntity.badRequest().body(responseDTO);
}
}
}package com.unoSpringBoot.study.SO;
import org.springframework.beans.factory.annotation.Autowired;
import org.springframework.http.ResponseEntity;
import org.springframework.web.bind.annotation.RequestBody;
import org.springframework.web.bind.annotation.RequestMapping;
import org.springframework.web.bind.annotation.RestController;
import com.unoSpringBoot.study.Controller.User.RegistUserCO;
import com.unoSpringBoot.study.DTO.UserDTO;
@RestController
@RequestMapping("/auth")
public class UserSO {
@Autowired
RegistUserCO registUserCO;
public ResponseEntity<?> registUser(@RequestBody UserDTO userDTO) {
return registUserCO.registUser(userDTO);
}
}가입하는 것을 만들었습니다.
그리고 로그인하는 것을 만들어줍시다!
package com.unoSpringBoot.study.Controller.User;

import org.springframework.beans.factory.annotation.Autowired;
import org.springframework.http.ResponseEntity;
import org.springframework.stereotype.Service;

import com.unoSpringBoot.study.DTO.ResponseDTO;
import com.unoSpringBoot.study.DTO.UserDTO;
import com.unoSpringBoot.study.model.UserEntity;
import com.unoSpringBoot.study.service.UserService;

@Service
public class LoginUserCO {
	@Autowired
	private UserService userService;

	public ResponseEntity<?> authenticate(UserDTO userDTO) {
		UserEntity user = userService.getByCredentials(userDTO.getEmail(), userDTO.getPassword());
		if (user != null) {
			final UserDTO responseUserDTO = UserDTO.builder().email(user.getUserName()).id(user.getId()).build();
			return ResponseEntity.ok().body(responseUserDTO);
		} else {
			ResponseDTO<?> responseDTO = ResponseDTO.builder().error("로그인 실패 ㅠ").build();
			return ResponseEntity.badRequest().body(responseDTO);
		}
	}
}
@PostMapping("/signin")
public ResponseEntity<?> signinUser(@RequestBody UserDTO userDTO) {
return loginUserCO.authenticate(userDTO);
}구현한 부분을 실행한 후 포스트맨으로 테스팅해봅시다!
{
"email" : "zhfldk014745@naver.com",
"username" : "김은호",
"password" : "1234"
}
이렇게 작성해주시고
JSON 형태로 포스트매핑이니까 포스트형식으로 던져봅시다!
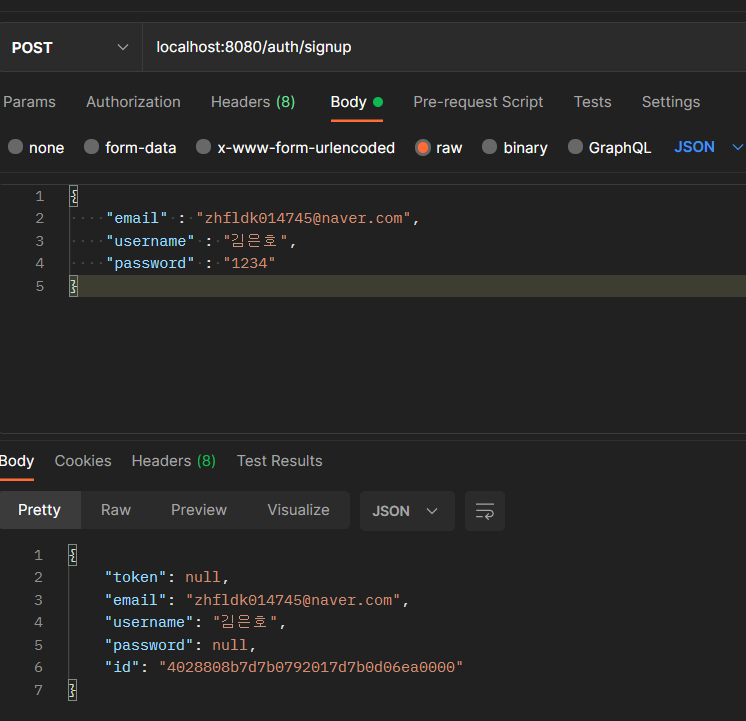
가입이 완료되었다.
그리고 로그인을 하는 signin URL로 포스트형식으로 접근해봅시다!
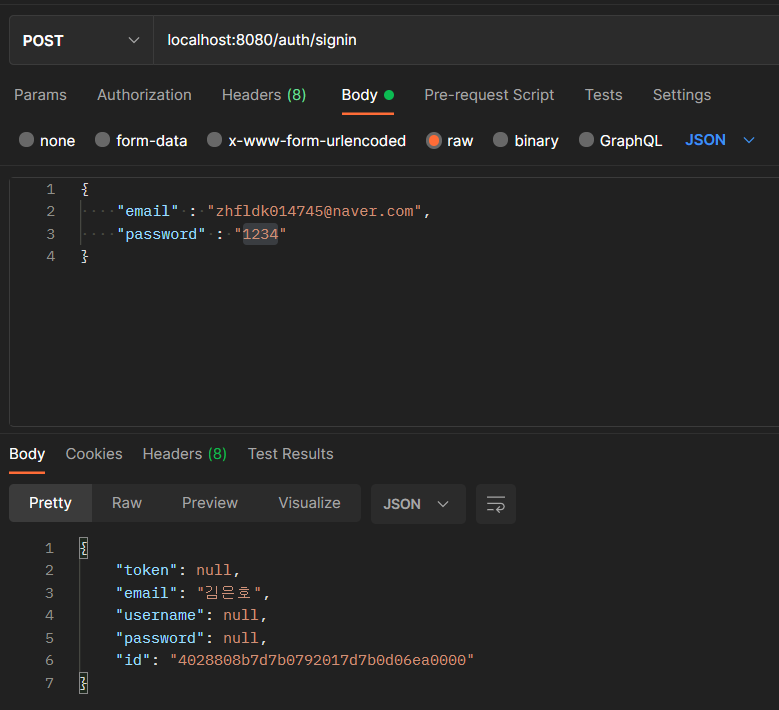
로그인이 완료되었습니다
그런데 이랬을떄 문제점은 로그인만되고 로그인 상태가 유지되지 않습니다. ㅠㅠ
로그인을 구현했지만 다른 API는 사용자가 로긍니했는지 아닌지 모르는겁니다.
그리고 지금까지 작성한 API는 사용자 로그인 여부 자체를 확인하지 않는것입니다.
우리가 작성한 Create TODO API에서는 임의로 제가 아이디를 unokim이라는 아이디를 고정적으로
넣어주었었습니다.
그리고 패스트워드를 암호화하지 않았습니다. 보안 규정에 위배됩니다. ㅠㅠ
정리
사용자를 관리하는데 필요한 엔티티, 리포지토리, 서비스, 컨트롤러를 구현해봤습니다.
이 부분은 Todo기능을 구현할 때 했던 작업과 같은 작업이고, 스프링 시큐리티와는
상관없는 우리 애플리케시션이 사용자를 관리하려고 자체 개발한 서비스입니다.
또 User관련 레이어를 구현한 후 현재 구현의 문제점을 마지막에 말씀드렸습니다.
기본적으로 로그인 상태가 유지되지않는다는것이 가장 큰 문제이긴합니다.
앞으로 는 로그인상태유지와 지속적인 인증을 위해 스프링 시큐리티에서 제공하는
인터페이스를 구현하겠습니다.

감사합니다
'Spring boot 프로젝트 기록 > 3. 인증 백엔드 통합' 카테고리의 다른 글
| 패스워드 암호화 (0) | 2021.12.13 |
|---|---|
| TodoController에서 인증된 사용자 사용하기 (0) | 2021.12.12 |
| JWT 를 이용한 인증 구현 (0) | 2021.12.12 |
| 스프링 시큐리티 통합 -1 (0) | 2021.12.08 |


댓글